

We’ve been back in Texas for a month now, and it’s been pretty non-stop in the kitchen. Dessert for a gourmet dinner group, a bake sale for the hurricane relief effort, two sets of houseguests, and a neighborhood reunion. Whew! Cleverly, I managed to make the same dessert for everyone but the bake sale.
First on the schedule was the gourmet group. It had an Italian theme, which was most fortunate, because before heading South, we’d spent two weeks visiting our favorite spot in Italy: the Amalfi Coast.

There’s something really nice about revisiting a place you love – all the must-do restaurants, the sites you most enjoyed in the past, the familiar tastes and smells. And because it’s not a voyage of discovery, you have the gift of time – looking and listening more closely to the hum of daily activity, spotting details of architecture and nature, and enjoying the occasional nap. On a couple of nights, we even eschewed the restaurant scene, bought a handful of items at the local tiny market, and luxuriated in a dinner on the balcony of our apartment.


 |
| Another presentation was topped with a tiny basil leaf and candied lemon peel. |
The name means “cooked cream” in Italian, but the cream (at least in this recipe) isn’t really cooked, just heated and combined with gelatin and flavoring. The classic way of serving panna cotta is unmolded, like a crème caramel, but one restaurant where I enjoyed it served it in a small glass with fruit sauce on top, so that’s the look I went for. Also, the Kitchen Goddess hates that whole process of letting the mixture set and then holding your breath while you see if the little darlings will emerge intact from their molds. Finally, I liked the layering of the custard and the topping. You, of course, are welcome to torture yourself with the mold/unmold process. If you do, be sure to oil your molds with vegetable oil before pouring in the custard.
This particular version is lighter than usual, in part because the cream combines with whole milk and crème fraîche, and in part because of the lemon flavoring. And just because she was in charge, the Kitchen Goddess threw a little elderflower liqueur into the berry sauce. Ooooh, yum.
I did switch out the blackberry sauce for lemon sauce with the neighborhood dinner, so you’ll find that as an alternative at the end of this post. Both are unbelievably easy. And again, because I was in charge, I made these really dreamy chocolate-espresso Italian wedding cookies. So that’ll be the fourth recipe you get with this one post. Don’t you just love the Kitchen Goddess?
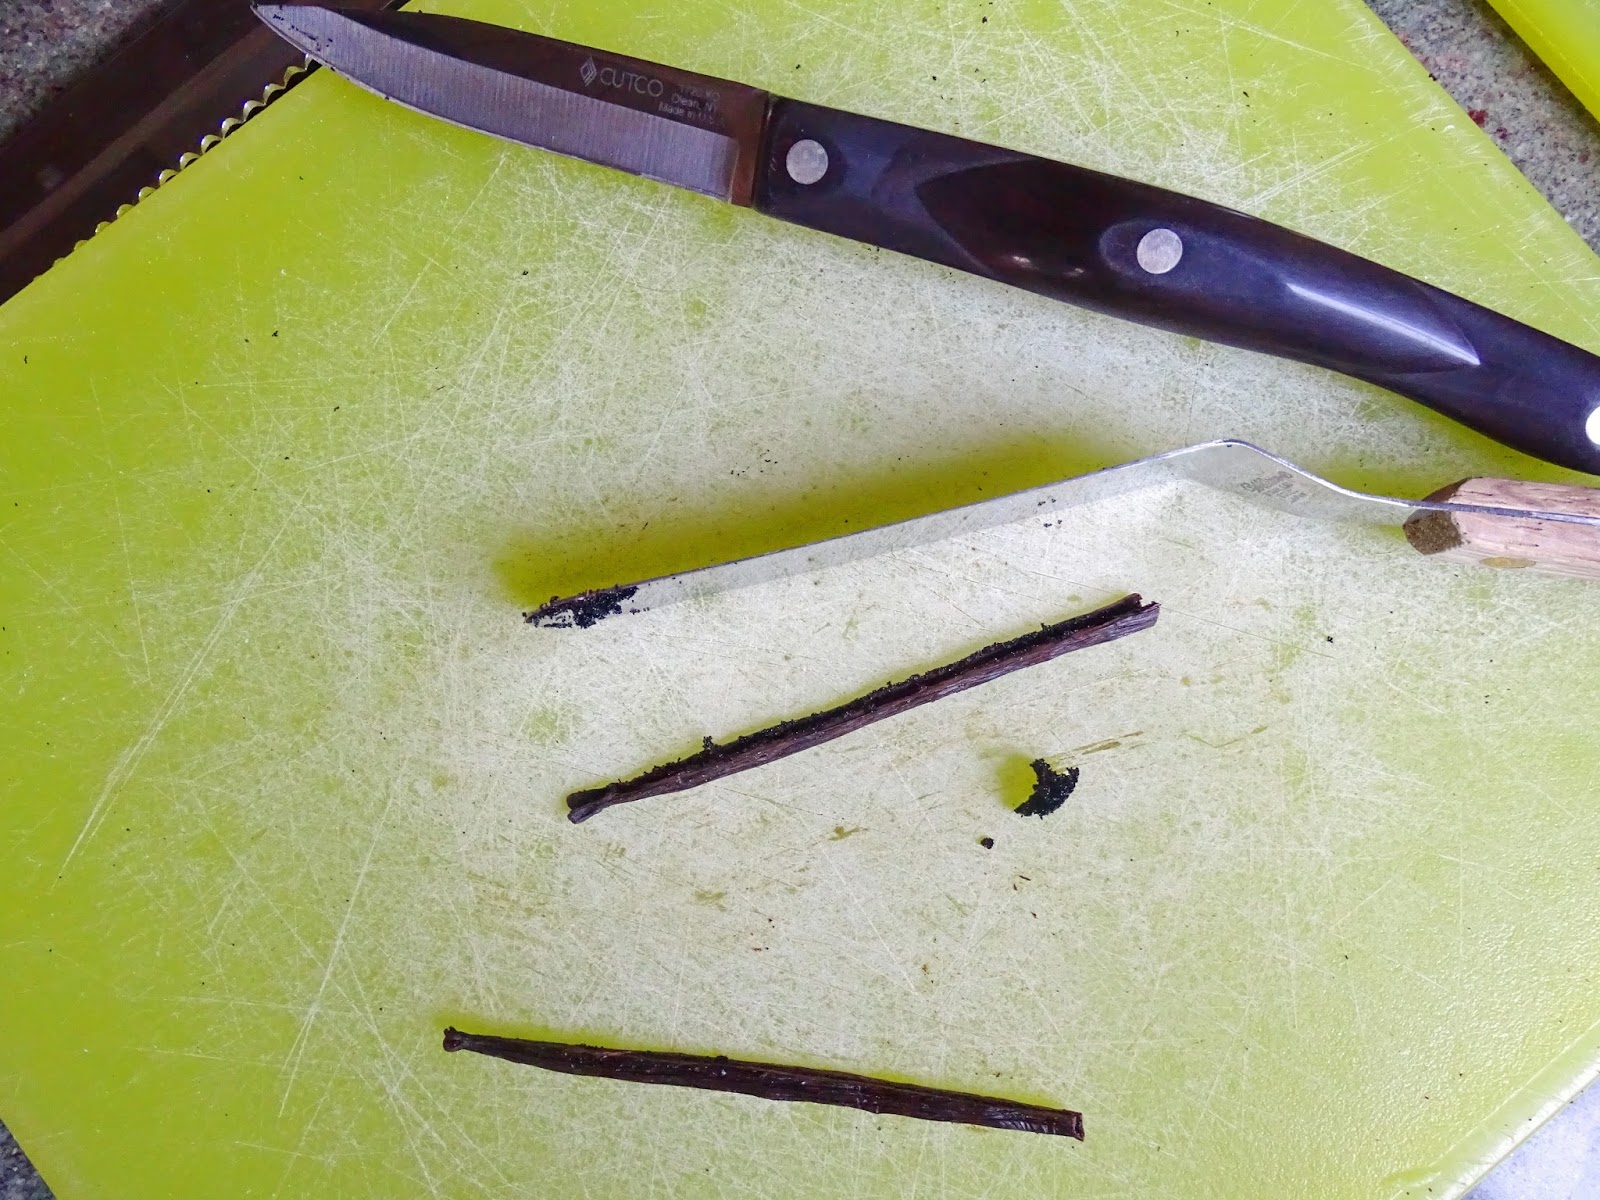
 A Kitchen Goddess note on vanilla beans: These weird-looking creatures are expensive, so if you prefer, you can substitute ½ teaspoon of pure vanilla extract. Make sure it’s not artificial vanilla flavoring – which is extracted from wood pulp, can you imagine? OMG, I’m feeling faint. Anyhow, the most important thing about vanilla beans – which are not nearly as scary as they look – is to get ones that are relatively fresh. I know, I know, those dark, shriveled beans don’t look especially fresh, but the ones you want will still be moist and flexible. So don’t buy brittle beans, and keep your beans in airtight bags or jars in a cool, dark place (NOT the fridge).
Lemon Panna Cotta with Blackberry Sauce
Adapted from Bon Appetit magazine, April 2003
Serves 6-8.
Ingredients
For the panna cotta:
1 cup whole milk
1 cup whipping cream
½ vanilla bean
4-5 strips (about ½ inch wide) of lemon peel, with as little white pith as possible
5 tablespoons fresh lemon juice
2 teaspoons unflavored gelatin
½ cup sugar
1 cup crème fraîche
For the blackberry sauce: [KG note: Use any berry you like – just substitute the same quantity of frozen berries.]
3 cups frozen blackberries (about 12 ounces), thawed, drained, juices reserved
3 tablespoons light brown sugar (packed)
3 tablespoons liqueur of your choice (The original recipe called for crème de cassis, which is black-currant-flavored liqueur; the Kitchen Goddess used St. Germain elderflower liqueur.)
Directions
Make the panna cotta:

Bring the liquid to a simmer, then cover it and remove the pan from the heat. Steep, covered, for 30 minutes, then stir in the lemon peel and steep, covered, another 10 minutes.

While the milk/cream is steeping, pour the lemon juice into a small bowl, and sprinkle the gelatin on top. (It needs to sit for 10-15 minutes before you’ll be able to combine it with the milk/cream.)
Using a fine mesh strainer, strain the milk mixture into a medium bowl to remove the lemon peel and any large pieces of vanilla bean.
Return the milk mixture to the saucepan, and add the sugar and the lemon gelatin mixture. Stir often over low heat until the sugar and gelatin dissolve, about 2 minutes.
Remove the pan from the heat and whisk in the crème fraîche. Divide the mixture among oiled ramekins (if you plan to unmold them), or whatever individual serving dishes you’re using. Cover the dishes with cellophane wrap and chill until set, at least 6 hours or overnight.
 |
| No sauce yet. Make sure the panna cottas are fully set before adding sauce. |

In a food processor or blender, purée the remaining berries and all reserved juices, brown sugar, and liqueur (if you’re using it). Using a fine-mesh strainer, strain the mixture into a small bowl, pressing with a wooden spoon or rubber spatula to extract as much liquid as possible. (This will take more effort than you wish it would, but you really want to get those seeds out. A food mill might be useful here, if you have one. The KG uses a spatula to scrape the solids back and forth in the strainer until they scream for mercy. But she is relentless and you needn’t be quite so much.)
 |
| That's the actual sauce in the bowl, upper right. Lower left is what remained after straining.This sauce is soooo easy. |
Assemble the dessert:
If you are serving the panna cotta a la Kitchen Goddess (i.e., in small glasses), once the custard has set, ladle a small amount of the sauce on top of each and add a berry or two. Return the glasses to the fridge, covered, until ready to serve.
If you are unmolding the panna cotta, run a paring knife around the edge of the ramekins. One at a time, dip the base of the ramekins in a bowl of hot water for 45 seconds. Lay a dessert plate on top of the ramekin, and holding the two together, invert them, shaking them gently, to remove the panna cotta. Garnish the custard with sauce and reserved berries. Serve immediately.
* * *
And here's the lemon sauce, for a change of pace. What the KG really likes about this is the translucent look of the sauce. No butter or cornstarch, so it’s not as opaque as most lemon sauces. If you want it more or less firm, just adjust the amount of gelatin.

Lemon Dessert Sauce
Makes about 1 cup.
Ingredients
½ teaspoon gelatin powder
¼ cup cold water
⅓ cup lemon juice (Meyer lemons or regular lemons, or a mix)
¾ cup sugar
Directions
Put the water into a small bowl, and sprinkle the gelatin over it. Let sit 10 minutes, to let the gelatin soften.
In a small saucepan, combine the lemon juice and sugar, and bring to a simmer, stirring only until the sugar is completely dissolved. Once it reaches a simmer, remove from the heat and stir in the gelatin. Put the pan back on low heat and stir until the gelatin is completely dissolved. Remove from heat and pour the syrup into a container. Refrigerate until ready to use.
 If you’ll be adding the syrup to the serving glasses with the panna cotta, wait until the syrup is cooled and the panna cotta is set. This syrup will gel somewhat, so add it to the panna cotta glasses before that point. With the panna cotta, you can add any number of garnishes: mint leaves, whole fresh raspberries, half a strawberry,.... Use your imagination!
* * *
And now for the cookies. The combination of coffee, cocoa, and pecans makes these Italian Wedding Cookies a great accompaniment to the lemon panna cotta, and they’re even pretty served on their own. The KG is not the only fan: 2,580 F&W readers gave these gems a 5-star rating.

Chocolate-Espresso Italian Wedding Cookies
Adapted from Food & Wine magazine, December 2011
Yield: Makes about 3 dozen cookies.
Ingredients
2 sticks unsalted butter, softened
½ cup sugar
2 teaspoons pure vanilla extract
1¾ cups all-purpose flour (about 221 grams)
¼ cup unsweetened cocoa powder (KG uses Hershey’s Special Dark Cocoa)
2 teaspoons instant espresso powder
½ teaspoon salt
2 cups finely chopped pecans
Confectioners’ (powdered) sugar, for coating
Directions
In a large bowl, mix the butter, sugar and vanilla on medium speed for about 2 minutes, until smooth and fluffy. Add the flour, cocoa powder, espresso powder and salt until well blended. Stir in the pecans. Refrigerate the dough, covered, for 1 hour.
Preheat the oven to 325°.
Line the cookie sheets with baker’s parchment, or grease them lightly with PAM Cooking Spray. (And if you don’t have baker’s parchment, why is that? OMG, the KG says they have changed her life.)

 |
| Before cooking. |
 |
| After baking. Not much change, but some will flatten slightly. Don't sweat it. |

It’s important to let the cookies cool on the sheets for 10 minutes, as the lack of egg in this recipe means they can easily fall apart if you touch them before they’ve cooled slightly. After the 10-minute cool, gently transfer the cookies to a rack to cool completely. Roll the cooled cookies in confectioners’ sugar to coat.
No comments:
Post a Comment