Tuesday, November 22, 2016

So-Easy Sides for a Thanksgiving Marathon: Day 4
What’s cooking? Cheesy Scalloped Potato Cups


The big day is almost here, and the Kitchen Goddess wants to once again take an opportunity to tell you how thankful she is that you stop by now and then. Writers need readers, just as cooks need eaters. But the reading part is much less obligatory, so I truly appreciate the time you spend here at Spoon & Ink.

And now, what you’ve all been waiting for: the carbs. Did you know that the first potatoes were found in southern Peru and northwestern Bolivia, some 7000-10,000 years ago? Me neither. Today, it’s the world’s fourth largest food crop, following maize, wheat, and rice. Ah, I love Wikipedia.

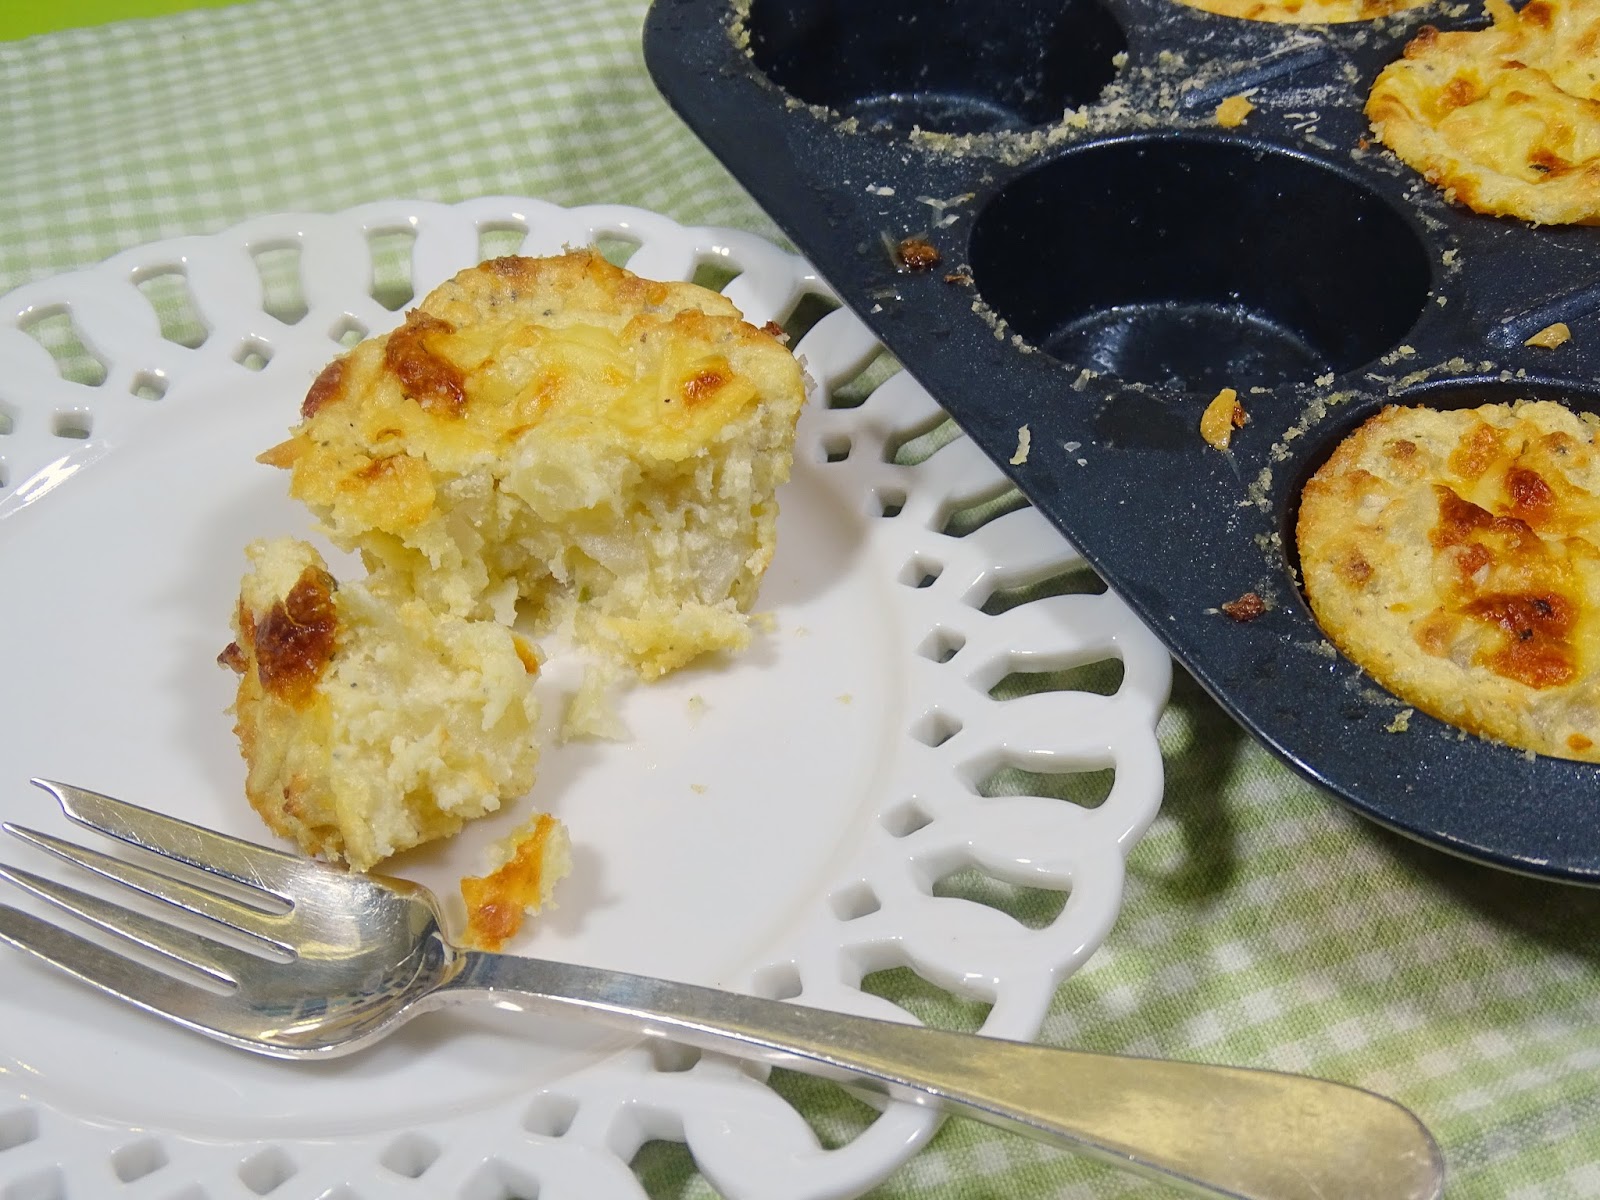
These potatoes, on the other hand, came not from South America but from Cook’s Country, an offshoot of America’s Test Kitchen. While I generally find their approach to cooking to be a bit tedious, I thought the idea of these individualized au gratin “cups” was very clever indeed. And not surprisingly, the taste is quite good. It’s hard to really screw up a potato-cheese combo, but there’s a lot to be said for getting one that doesn’t stick to the pan yet maintains that creaminess you can’t usually get without a big, goopy casserole and a whole lot of butter.

My potato cups didn’t get as brown and crispy as the Cook’s Country version, but perhaps with a thicker coating on the muffin tin, or perhaps more time in the oven... The Kitchen Goddess was  a bit pressed for time and needed to get this post finished. But she was gratified to notice that at least one other blogger who posted this recipe had even paler results.

The only other warning I will offer is that you find a casserole dish larger than the 1½-quart Pyrex dish I used for microwaving the potatoes with the half-and-half. I figured I just needed a dish that would hold the mixture. But it turns out that when you microwave cream continuously for a long time – 13-15 minutes – it boils furiously at some point and will make an unholy mess in your microwave when it boils over, even with a lid on the dish. The Kitchen Goddess felt vexed and humiliated. Grrrr...


Now, that unhappy part of the experience will not keep me from making these cups again. As I said, the taste is very good, and the convenience factor on serving them is outstanding. But next time, I’ll use a larger dish and stop the cooking every 3-4 minutes to stir the mixture down. It might take a bit more time in the microwave, but I won’t mind that. The Kitchen Goddess doesn’t like being vexed.

Kitchen Goddess notes: I know, most of this post seems like one long note, but this is about the choice of ingredients. So listen up.
(1) You want a potato that keeps its shape on the outside but cooks up dry and fluffy on the inside. Russets are ideal.
(2) Do not use pre-shredded cheese for this recipe. Or any other recipe, for that matter. Bagged cheese has additives – like potato starch, cellulose (wood pulp!) powder, and calcium sulfate – to keep it from clumping. The Kitchen Goddess cooks with pure cheese, and hopes you will do likewise.
(3) Grated Parmesan is a salty cheese-flavored substance that comes in cans, and also contains wood pulp. This recipe calls for grated Parmigiano-Reggiano, one of the world’s truly great cheeses. So buy some and grate it yourself. Or your grocer might grate it on site and sell it in plastic containers, and that’s ok, too.

So enough of the preachy stuff and on to the food. And have a glorious Thanksgiving!


Cheesy Scalloped Potato Cups

Adapted from Cook’s Country.

Serves 12.

Special equipment: non-stick muffin tin, and a microwaveable dish that holds at least 2 quarts

Ingredients
½ cup Panko bread crumbs
1 tablespoon unsalted butter, softened
2 pounds russet potatoes, peeled
1¼ cups half and half
1¼ teaspoon salt
¾ teaspoon freshly ground black pepper
5½ ounces (about 1⅓ cups) shredded sharp cheddar (Feel free to mix it up with this cheese – I used 4 ounces Welch cheddar and 1½ ounces Gloucester, and it was divine.)
1¼ ounces (about ⅔ cup) grated Parmigiano-Reggiano
2 teaspoons cornstarch
PAM, or other cooking oil spray

Directions
Preheat oven to 425º. Set a rack at the lowest position in the oven.

In the bowl of your food processor, pulse the Panko crumbs 4-5 times, to get a fine consistency.

Grease the muffin cups well with the butter, covering the sides and bottoms evenly. (A pastry brush works well.) Coat the cups with the ground Panko.


Slice the potatoes in half lengthwise. At this point, the Cook’s people would have you cut each half into thirds and then cut crosswise in ¼-inch slices, per the photo here. That’s all fine, but in my humble opinion, it is a bit precious. I think you could cut straight down in a grid, to get pieces that are still ¼-inch thick but closer to square shapes, which would be easier. It’s the ¼-inch thickness that’s important, for consistent doneness.


Combine the potatoes, half-and-half, salt, and pepper in a large, microwaveable bowl (covered), for 15 minutes, stopping every 3-4 minutes to gently stir the mixture and keep the cream from boiling over. If the potatoes are not tender after 15 minutes, run the mixture another 2-3 minutes.


While the potato-cream is cooking, stir together the cheeses and cornstarch in a bowl, and reserve ⅓ cup of the mix.

When the potatoes are tender, stir the cheeses into the potato-cream mixture until smooth. Spoon the mix into the muffin cups and top with the reserved ⅓ cup of cheese.


Cover the muffin tin with a sheet of aluminum foil that has been sprayed with cooking oil. Place the covered tin into the oven on the lowest rack, and bake at 425º for 10 minutes. Remove the foil and continue to bake for 13-15 minutes, or until golden brown.

Set the muffin tin on a rack and loosen the sides of the potato cups using a paring knife or icing spatula. Allow the cups to cool in the tin for 5 minutes. To remove the cups, place a rimmed baking sheet over the tin and invert the two. Tap the bottoms of the tin to release the cups. Let the cups cool 5 minutes on a wire rack before serving.


Monday, November 21, 2016

So-Easy Sides for a Thanksgiving Marathon: Day 3
What’s cooking? Lemony Green Beans with Frizzled Leeks


I was discussing my own Thanksgiving menu with a friend who’ll be joining us that day, and she said that while everyone enjoys having lots of choices, mostly she thinks they like simple, straightforward foods.

I tend to agree, although that thought doesn’t stop me when I find a dish that sounds really really good but is slightly offbeat. For instance, I’m still planning to make my mashed potatoes with kale-collards pesto.

But I’m going for the simple treatment on today’s green beans. And the sample batch I made
– for you, dear readers! – was so flavorful, I’ll also be serving them at my own table on Thursday.

What caught my eye was the word “frizzled.” It just sounded fun, and when a dish is fun to say, that’s a good start. The frizzled leeks followed through on that note, with a little bit of crunch and a toasty flavor that reminds me a bit of popcorn. Hmmm, maybe next year I should try popcorn on my green beans.

In any case, the frizzle process helps bring out the natural sweetness in the leeks. Combine that toasty sweetness with the lemony treatment on the beans, and you have a memorable combination, without a lot of work.

Kitchen Goddess note: My grandmother cooked all vegetables in a pressure cooker, so it was years into adulthood before I discovered how wonderful green beans could taste... if you didn’t cook them too much. So please, folks, do not steam your green beans more than 3 minutes. If you do, there’ll be no life left in them once they go through the second stage of cooking, and even the deliciousness of the frizzled leeks will not save them.


Lemony Green Beans with Frizzled Leeks

Adapted from Anna Stockwell at epicurious.com, September 2016.

Serves 6.

Ingredients
1 pound green beans (preferably the thin haricot verts), stem ends trimmed
1 cup canola oil
1 large leek, white and light green parts only
1 tablespoon lemon zest (1 lemon)
3 tablespoons freshly squeezed lemon juice (For the juice and the zest, one fat lemon should do the trick. Just be sure to zest before you juice.)
1 teaspoon kosher salt, plus some for salting the frizzled leeks
½ teaspoon freshly ground pepper
Garnish: lemon wedges


Procedure
Prepare an ice water bath for the green beans. Using a basket steamer in a large, covered stockpot, steam the green beans – you may have to do this in two batches – for 3 minutes per batch. Working quickly, transfer the steamed beans to the ice water bath for 1-2 minutes. Drain the beans and lay them out on paper towels to dry.


Slice the leeks crossways (white and light green parts only!), ⅛-inch thick, and gently separate the slices into circles.


Set a deep skillet over medium-high heat and add the oil. When the oil begins to shimmer, add the leek circles and cook, stirring occasionally, until golden brown, about 5 minutes. [Kitchen Goddess note: The KG’s leeks got a bit extra frizzled because she left them in the oil for the full 5 minutes. They still tasted great. But you may want yours to be a little more golden. Just watch them carefully, starting at the 4-minute mark.] When your leeks have reached a color you like, transfer them to paper towels on a plate, and season them with salt.


Turn the heat on the oil down to medium and stir in the lemon zest, the green beans, the teaspoon of salt, and the pepper. Using a large spoon or a spatula, toss the beans in the oil for about 5 minutes, to warm them through.

Remove the skillet from the heat and add the lemon juice, continuing to toss the green beans. Move the beans to a serving platter reserving about ¼ cup of the lemon/oil mixture to pour over the beans. Sprinkle the frizzled leeks on top and serve with lemon wedges.

The beans can be steamed a day ahead of serving, then dried and stored in an airtight container in the refrigerator.

Sunday, November 20, 2016

So-Easy Sides for a Thanksgiving Marathon: Day 2
What’s cooking? Roasted Butternut Squash with Fried Apples and Spiced Pecans


We’re on a roll, people. Thanksgiving arrives in less than a week, no matter how hard you might wish it would wait just a few more days. And everyone’s got a few houseguests, so there are sheets to change, towels to wash, menus to plan. If only you didn’t love them so much...

Amid the flurry of shopping and cleaning and cooking, it’s really easy to forget about things like... the table setting. THE TABLE SETTING???!! OMG, I HAVE TO SET THE TABLE...

So I want you all to calm down. The Kitchen Goddess has your back. And while I won’t be coming over to your house to help, I do have links here to a couple of my favorite posts, with heartfelt recommendations about candles and napkins and table decor. Nothing brilliant, mind you, but some ideas, and God knows, we could all use someone else’s thoughts these days.

On the subject of table setting, I’m one of those people who think that – surely – something in the yard will work. Something free. And you’d be surprised at how a little of that cheap but sparkly leaf-shaped confetti from places like Party City will dress up the table and add a little fun. Take a look here: Table Settings & Napkin Folding


The second thing many people forget about are the candles. I’m a little over-zealous on this topic, but with good reasons:

1. Everyone looks better with a little candlelight.

2. Candlelight is prettier and more flattering than electric light.

3. Candles are a symbol of hospitality and hope, and we could all use a little hope.

Here’s a link to my full post on candles – with pointers on use and storage – which I hope will inspire you: Candles


* * *

And now on to the food. Yesterday, I wrote about cauliflower, a white vegetable. Today, we’re moving on to orange, and my favorite orange veggie, butternut squash.

The easy way
Last year, the Kitchen Goddess discovered – belatedly – that her grocery store stocks pre-cut butternut squash. I say belatedly because it was after chopping it herself. And while I don’t go for pre-cut stuff like celery and onions, I will make an exception for butternut squash, if only because it turns my hands orange. Now, whether or not you buy yours whole and chop it yourself or luck into the pre-cut stuff at your grocery store, butternut squash is a magnificent food.

The hard way -- but not that bad.


First off, it’s a great source of fiber and vitamins (A, C, and E) and minerals (manganese, magnesium, potassium). Roasted, puréed, or mashed, its sweet, nutty taste becomes even richer with cooking, and it pairs well with any number of spices and fruits. Like apples. Fried apples. Can’t you just taste the combo?

Today’s recipe is from Food & Wine magazine, whose writers assure you the whole thing can be done in an hour. But I’m pretty sure they’re assuming either that you bought the squash already diced or that you forgot to start the timer until after the squash was cut. Whatever. It’s well worth the little bit of trouble to cut it up yourself if you can’t buy it cut. Beyond that part, the dish can easily be completed in an hour. Once you have the squash in the oven, there’s plenty of time to peel, dice, and cook the apples.

And now, a confession. The Kitchen Goddess got hold of this recipe and thought how nice it would be with some sugared/spiced pecan bits as a garnish. And the rather large inventory of nuts in her fridge turned the thought into a mandate. So you don’t have to add them, but they do contribute texture and flavor. And while the KG made her own (see recipe below), you could easily grab some at your market or a fancy food shop.


Roasted Butternut Squash with Fried Apples and Spiced Pecans

Adapted from Robert Stehling in Food & Wine magazine, November 2002.

Serves 6-8.

Ingredients
2 pounds of butternut squash, peeled and cut into ¾-inch dice (If you buy it whole, get an extra few ounces to allow for the loss of skin and seeds.)
7 tablespoons unsalted butter
1½ tablespoons fresh dill, finely chopped
Kosher salt and freshly ground pepper
1¼ pounds Granny Smith apples (about 2 large), peeled, seeded, and cut into ¾-inch dice
1½ tablespoons brown sugar (light or dark)
½ teaspoon cinnamon
Optional garnish: sugared/spiced pecans, chopped (recipe follows)

Directions
Preheat the oven to 425º.

Melt 4 tablespoons of the butter. In a large bowl, toss the diced squash with the butter and the chopped dill. Spread the squash in a large, rimmed baking pan and season lightly with salt and pepper.

Roast the squash 30 minutes, stirring once midway through the roasting time. It should be very tender and starting to brown.


While the squash is roasting, melt the remaining 3 tablespoons of butter on high in a large skillet (preferably non-stick). Add the diced apples in a single layer and cook on a high setting, without disturbing them, for 2-2½ minutes, then turn them over as best you can and continue to cook them, undisturbed, another 2-2½ minutes.


In a small bowl, stir together the brown sugar and cinnamon, and sprinkle it over the apples. Stir the apples another 2 minutes on medium-high heat, until lightly caramelized.

When the squash has finished roasting, toss it in a large bowl with the fried apples and serve warm or at room temperature. Garnish with chopped sugared/spiced pecans.


Sugared/Spiced Pecans

Adapted from Mark Bittman’s How to Cook Everything (2008).

Ingredients
Neutral oil for greasing the pan
2 cups water
2 cups sugar
1 pound pecan halves
½ teaspoon ground cinnamon
½ teaspoon ground clove
½ teaspoon ground nutmeg
½ teaspoon ground cumin
½ teaspoon ground fennel or fennel pollen
1 teaspoon Aleppo pepper (or ½ teaspoon cayenne pepper)
1 teaspoon salt

Directions
Pre-heat the oven to 450º. Liberally grease a large, rimmed baking sheet with a neutral oil (peanut or grapeseed or canola).

In a deep skillet over high heat, stir together the water and sugar until the sugar dissolves. Bring the syrup to a boil and add the nuts and the spices. Stir well to combine.

Reduce the heat to medium and cook the nuts, stirring frequently, for 15-20 minutes, or until most of the water has evaporated and the syrup is very thick.

Turn the heat to its lowest setting (to keep the syrup from solidifying while you remove the nuts) and use a slotted spoon to transfer the nuts from the skillet and onto the oiled baking sheet. Let the excess syrup drip off the nuts while you’re still holding them over the skillet.

Roast the nuts in the oven for 10 minutes, turning them once or twice with a spatula. Let the nuts cool before handling. (You may have to use a spatula to scrape them off the baking sheet.) Store in an airtight container for a week or two.

Saturday, November 19, 2016

So-Easy Sides for a Thanksgiving Marathon: Day 1
What’s Cooking? Roasted Cauliflower with Tangy Whipped Cheese Sauce


Every year, the Kitchen Goddess goes a little nuts trying to find new ways to fill your Thanksgiving plate with veggies. And last year, one of my friends pointed out that these ideas don’t actually emerge from the KG’s thought process until rather late in the game – the point at which you’ve already made many of those critical menu decisions, and the KG’s fabulous suggestions only muddy the waters. So this year, I thought I’d start waaay earlier. But you have to walk before you can run, and the word “early” has always been a bit problematic for me. So here we are a full two days before the usual launch point. It’s the best I could do this year.

I did have a focus this time around on dishes that will at least ease the stress level in your kitchen. No elaborate processes or hard-to-find ingredients, no unfamiliar terms, no special garnishes that require a trip to God-knows-where. And each a refreshing take on a veggie that will pique the interest of your Thanksgiving guests.

So without further ado, I present to you a whole cauliflower. Yessiree. You take that sucker, trim the leaves and stem, and roast it whole. But first, you give it a nice warm bath in wine and a bit of flavoring. Whew – you could make a sponge taste good with that bath. Okay, maybe not a sponge. But the cauliflower is tender and perfectly seasoned throughout. The subsequent roasting adds a browning and a bit of flavorful crust.  My skeptical hubby practically inhaled it.

And then there’s the cheese sauce. No cook-ee, no worry. Make the whole thing in a food processor, and drizzle a little olive oil on top. Serve at room temp. (If you don’t have a food processor, you’ll have to wait for tomorrow’s recipe.)

Kitchen Goddess note on cauliflower: Yes, it’s good for you, and a great low-fat, low-carb substitute for rice or potatoes. But did you know it’s also popular with mathematicians for its fractal dimension? (Careful what you’re thinking – the KG is a mathematician.) Uh-huh. That means two things. First, every branch, or “module,” is similar to the entire cauliflower. And then, as modules become more distant from the center, the angle between them is 360º divided by the golden ratio. Arent you glad you asked?

Back in the real world, here it is – the first of the Kitchen Goddess’s so-easy sides. It’s adapted from the pages of Food52.com’s Genius Recipes, one of my new go-to sources. To help you have a happy, stress-free Thanksgiving!


Roasted Cauliflower with Tangy Whipped Cheese Sauce

Adapted from Alon Shaya in Food52’s Genius Recipes.

Serves 4-6.

Ingredients
For the cauliflower:
1 whole head cauliflower (white, orange, purple, or even a fantastic Romanesco)
6 cups water
2½ cups dry white wine
⅓ cup olive oil, plus more for drizzling
¼ cup kosher salt
3 tablespoons fresh lemon juice
2 tablespoons unsalted butter
1 tablespoon Aleppo pepper (can substitute crushed red pepper flakes)
1 tablespoon sugar
1 large bay leaf

For the cheese sauce:
4 ounces fresh goat cheese
3 ounces cream cheese
3 ounces crumbled feta cheese
⅓ cup heavy cream
2 tablespoons olive oil
Finely ground salt such as sea salt or Maldon salt

Directions
Before you start on the cauliflower, take the three cheeses for the sauce out of the fridge and set them aside. And now that you’ve done that,...

Remove the leaves on the cauliflower and trim the stem back to where the florets start.


In a large pot, combine the water, white wine, olive oil, salt, lemon juice, butter, Aleppo pepper, sugar and bay leaf. Stir well to combine until the sugar and salt dissolve. Bring the mixture to a boil.


Slowly and carefully – no splashing! – lower the cauliflower into the broth, and spoon some of the broth over the top. (It doesn’t matter if it’s crown up or down, as you’ll be turning it occasionally.) Reduce the heat and simmer the cauliflower for 20 minutes, turning it over occasionally. When it’s done, you should be able to pierce the center easily with a knife.

While the cauliflower is poaching, preheat the oven to 475º.


When the cauliflower has finished poaching, turn off the heat and, using a sieve or a couple of slotted spoons, carefully transfer the cauliflower to a rimmed baking pan. Drain the cauliflower well before putting it into the oven. Roast 35-40 minutes at 475º, rotating the pan after 20 minutes.


While the cauliflower is roasting, put all the cheese sauce ingredients into the bowl of a food processor and pulse until smooth. Add salt to taste, and transfer the sauce to a small bowl. Drizzle a small amount of olive oil on top. Kitchen Goddess note: You can make the cheese sauce up to a day earlier, and refrigerate it. Bring it out 30 minutes before serving.


When the cauliflower is well browned, move it to a plate and drizzle it lightly with olive oil. Serve with tangy cheese sauce.


And come back tomorrow for number 2 of my So-Easy Sides.


Tuesday, November 15, 2016

Did Somebody Say “Gesundheit”?
What’s cooking? Shakshuka with Goat Cheese and Broccoli Rabe


While working on this dish, I started thinking about how many cloves of garlic I’ve chopped in my life. Surely thousands. And yet I’m not significantly better at it than ever. Not like those chefs who ninja their garlic in nanoseconds and turn out perfectly even, teeny-tiny dice. I watched a video posted by one of my food blogger friends, and it was truly impressive. I’m not going to give you the link because it would make me look bad, and that’s not what this blog is for. This blog is for making me look GOOD.

On the other hand, I heard Ruth Reichl (former editor of Gourmet) speak not long ago about her new cookbook, and she says she’s never had a cooking lesson, so her knife skills are hopeless. My kind of woman.

So in the run-up to Thanksgiving, we all need to be conserving our strength for the Herculean tasks to come. And as usual, the Kitchen Goddess is working on a few nice side dishes for you that will make veggies the star of the show. But in the meantime,...

Shakshuka! Sounds like someone sneezed, doesn’t it? Instead, it’s a terrific dish for a Sunday night supper or when you just want something straightforward that doesn’t dirty a bunch of bowls/pans. Conceptually, it’s a lot like a frittata in the sense that you can pump it up with whatever veggies you’ve got on hand, add some cheese, change the herbs, toss in some olives, etc. And it’s quite good reheated the next day for lunch.

At its most basic, shakshuka (also spelled shakshouka) is a dish of eggs poached in tomato sauce with onions, peppers, paprika, and cumin. It’s a staple of North African cuisines – Libyan, Tunisian, Algerian, Moroccan, and Egyptian – where it’s often served for breakfast; but it’s sufficiently hearty, especially with the various additions, that it’s also served at the evening meal, especially in winter. According to Wikipedia (who else?), shakshuka is also popular in Israel, where it was introduced by Tunisian Jews who immigrated there in the 1950s; and it’s strikingly similar to the Turkish dish, menemen.

So here’s the version the Kitchen Goddess served this week. What I liked most about it is the way the sweetness of the caramelized onions and peppers balanced with the bitterness of the broccoli rabe and the goat cheese. And my hubby sneaked a second helping when I wasn’t looking. So try mine or see what’s in your fridge that’ll make it your own.

Kitchen Goddess note: Broccoli rabe – pronounced rahb – is a relatively bitter green, more popular in Italy than the U.S., but it has gained popularity over the last few years. Its use in France goes back to the 16th century. As you might expect, it’s packed with vitamins and cancer-fighting agents. It’s also a good source of protein, and one of the best sources of vitamin K, which protects against osteoporosis. 

This is a “saucy” dish, so you’ll want to serve it with something to sop up the juices – a crusty sourdough, pita, and naan all come to mind. It’s a one-dish meal, so you won’t need anything else.


Shakshuka with Goat Cheese and Broccoli Rabe


Adapted from Melissa Clark in The New York Times.

Serves 4.

Ingredients
Broccoli rabe
1 bunch broccoli rabe (also known as rapini)
3 tablespoons olive oil
1 large onion, halved and thinly sliced
1 large red bell pepper, halved, seeded, and thinly sliced
1 tablespoon tomato paste
1-2 teaspoons minced garlic
1½ teaspoons ground cumin
1 teaspoon sweet paprika (option: smoky paprika or a combination)
½ teaspoon Aleppo pepper (or ⅛ teaspoon cayenne pepper)
1 28-ounce can of whole plum tomatoes, with juice, coarsely chopped [Kitchen Goddess note: You can chop the tomatoes before adding them to the skillet, or add them to the skillet and chop them there, or use a potato masher on them. Or buy canned chopped tomatoes. The KG likes her tomatoes to be less uniformly chopped, but then you knew she would.]
4 ounces fresh goat cheese, crumbled
¾ teaspoon kosher salt
¼ teaspoon freshly ground black pepper
6 large eggs
Optional garnishes: chopped Italian parsley and chopped cilantro, hot sauce

Mise en place -- this recipe is a lot easier if you have everything ready.

Directions
Bring a pot of well-salted water to a boil and drop in your broccoli rabe for 5 minutes. Drain it well and chop it into pieces about an inch long. Reserve.

Preheat the oven to 375º.

Put a large, oven-proof skillet over medium/medium-low heat and add the olive oil. Add the onion and bell pepper and cook, stirring frequently, about 15 minutes. You want the vegetables to soften, and for the onions to get golden, not brown. Stir in the tomato paste and the garlic, and continue to cook, stirring, another minute. Add the cumin, paprika, and Aleppo pepper, and continue to cook, stirring, another minute.

Stir in the chopped tomatoes with their juices. Simmer the mixture for 10 minutes, stirring occasionally, until tomatoes have thickened. Add the crumbled goat cheese and stir. (It’s okay if the goat cheese isn’t thoroughly mixed. Mix it as much as you’d like.) Taste the sauce for seasoning.

With a spoon, hollow out a small area in the sauce, about an inch from the edge of the skilllet, and crack an egg into it. Do the same with the remaining eggs, spacing the eggs evenly around the skillet. Season the eggs lightly with salt and pepper.


Transfer the skillet to the oven and cook at 375º for 7-9 minutes, depending on how runny you like your eggs. Sprinkle with parsley and cilantro.

Oops! I forgot the parsley and cilantro. Ah, well...
Serve with hot sauce and some type of bread. The Kitchen Goddess recommends crusty sourdough, naan, or other flatbread.